FREESKY Blogs
Stay updated with the latest news, tips, and insights on e-bikes, technology, and sustainable riding through the FREESKY blog.


There's no item in your cart.
You May Also Like
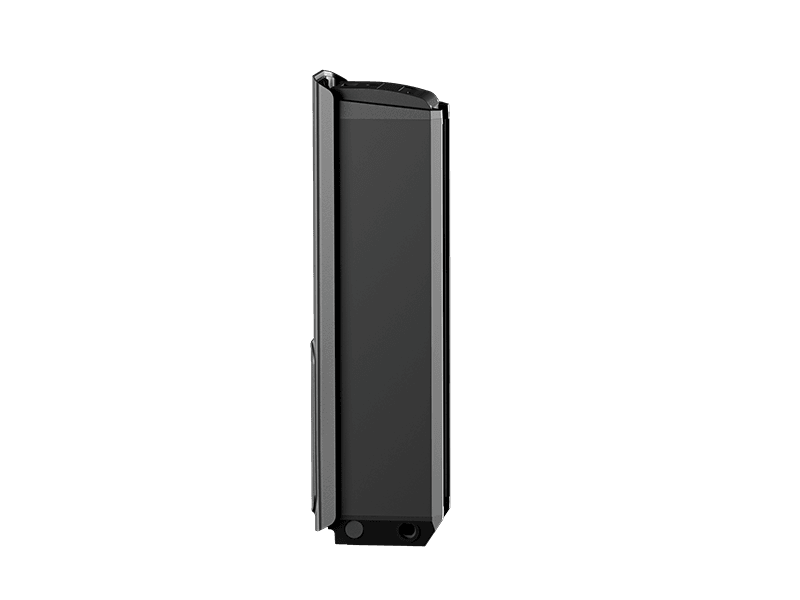
Extra Battery Pack
€600,00
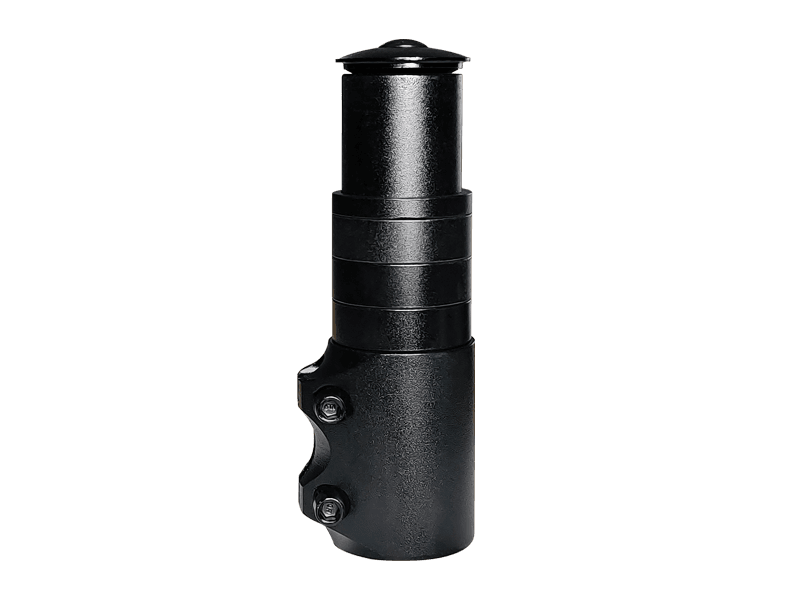
Stem Extender
€40,00
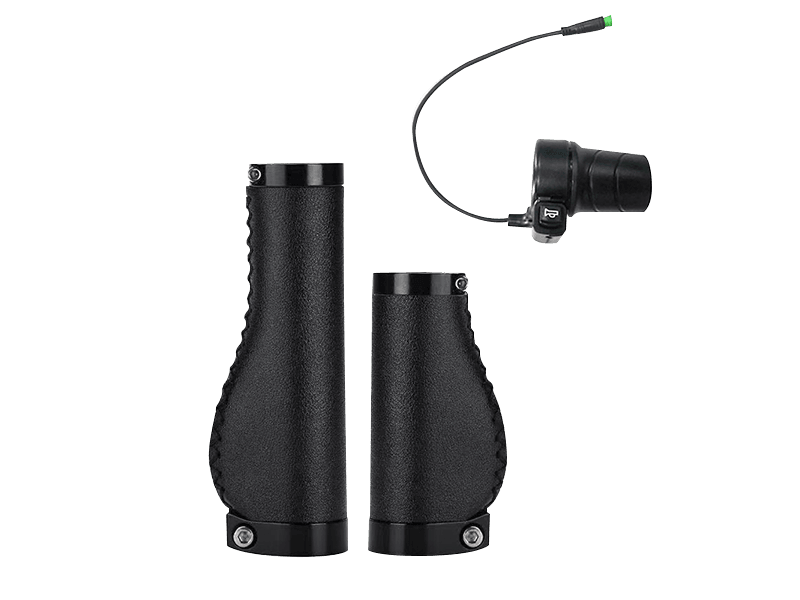
Twist Throttle with Grips
€69,00
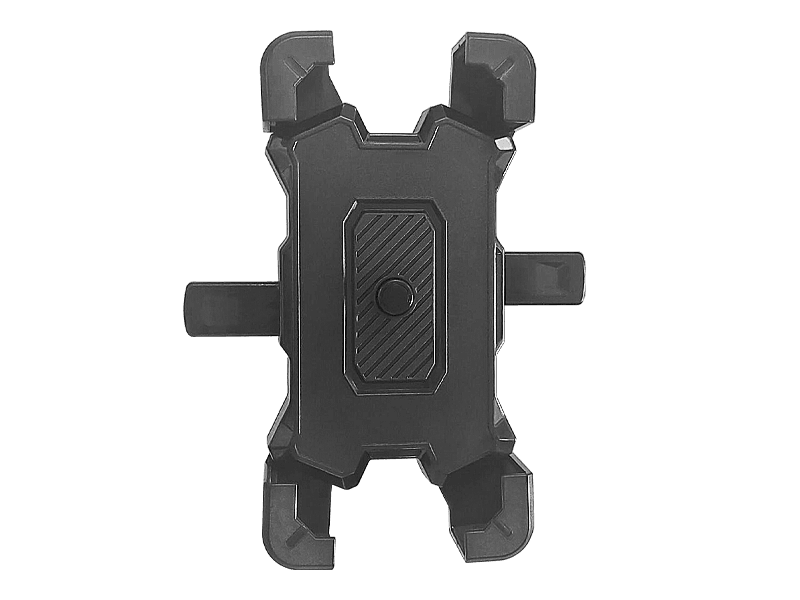
Phone Holder
€19,99
You're Saving €0,00
Shipping, taxes, and discount codes calculated at checkout.All Topics

How to Maintain Your E-Bike
Jan 31, 2025 11:10
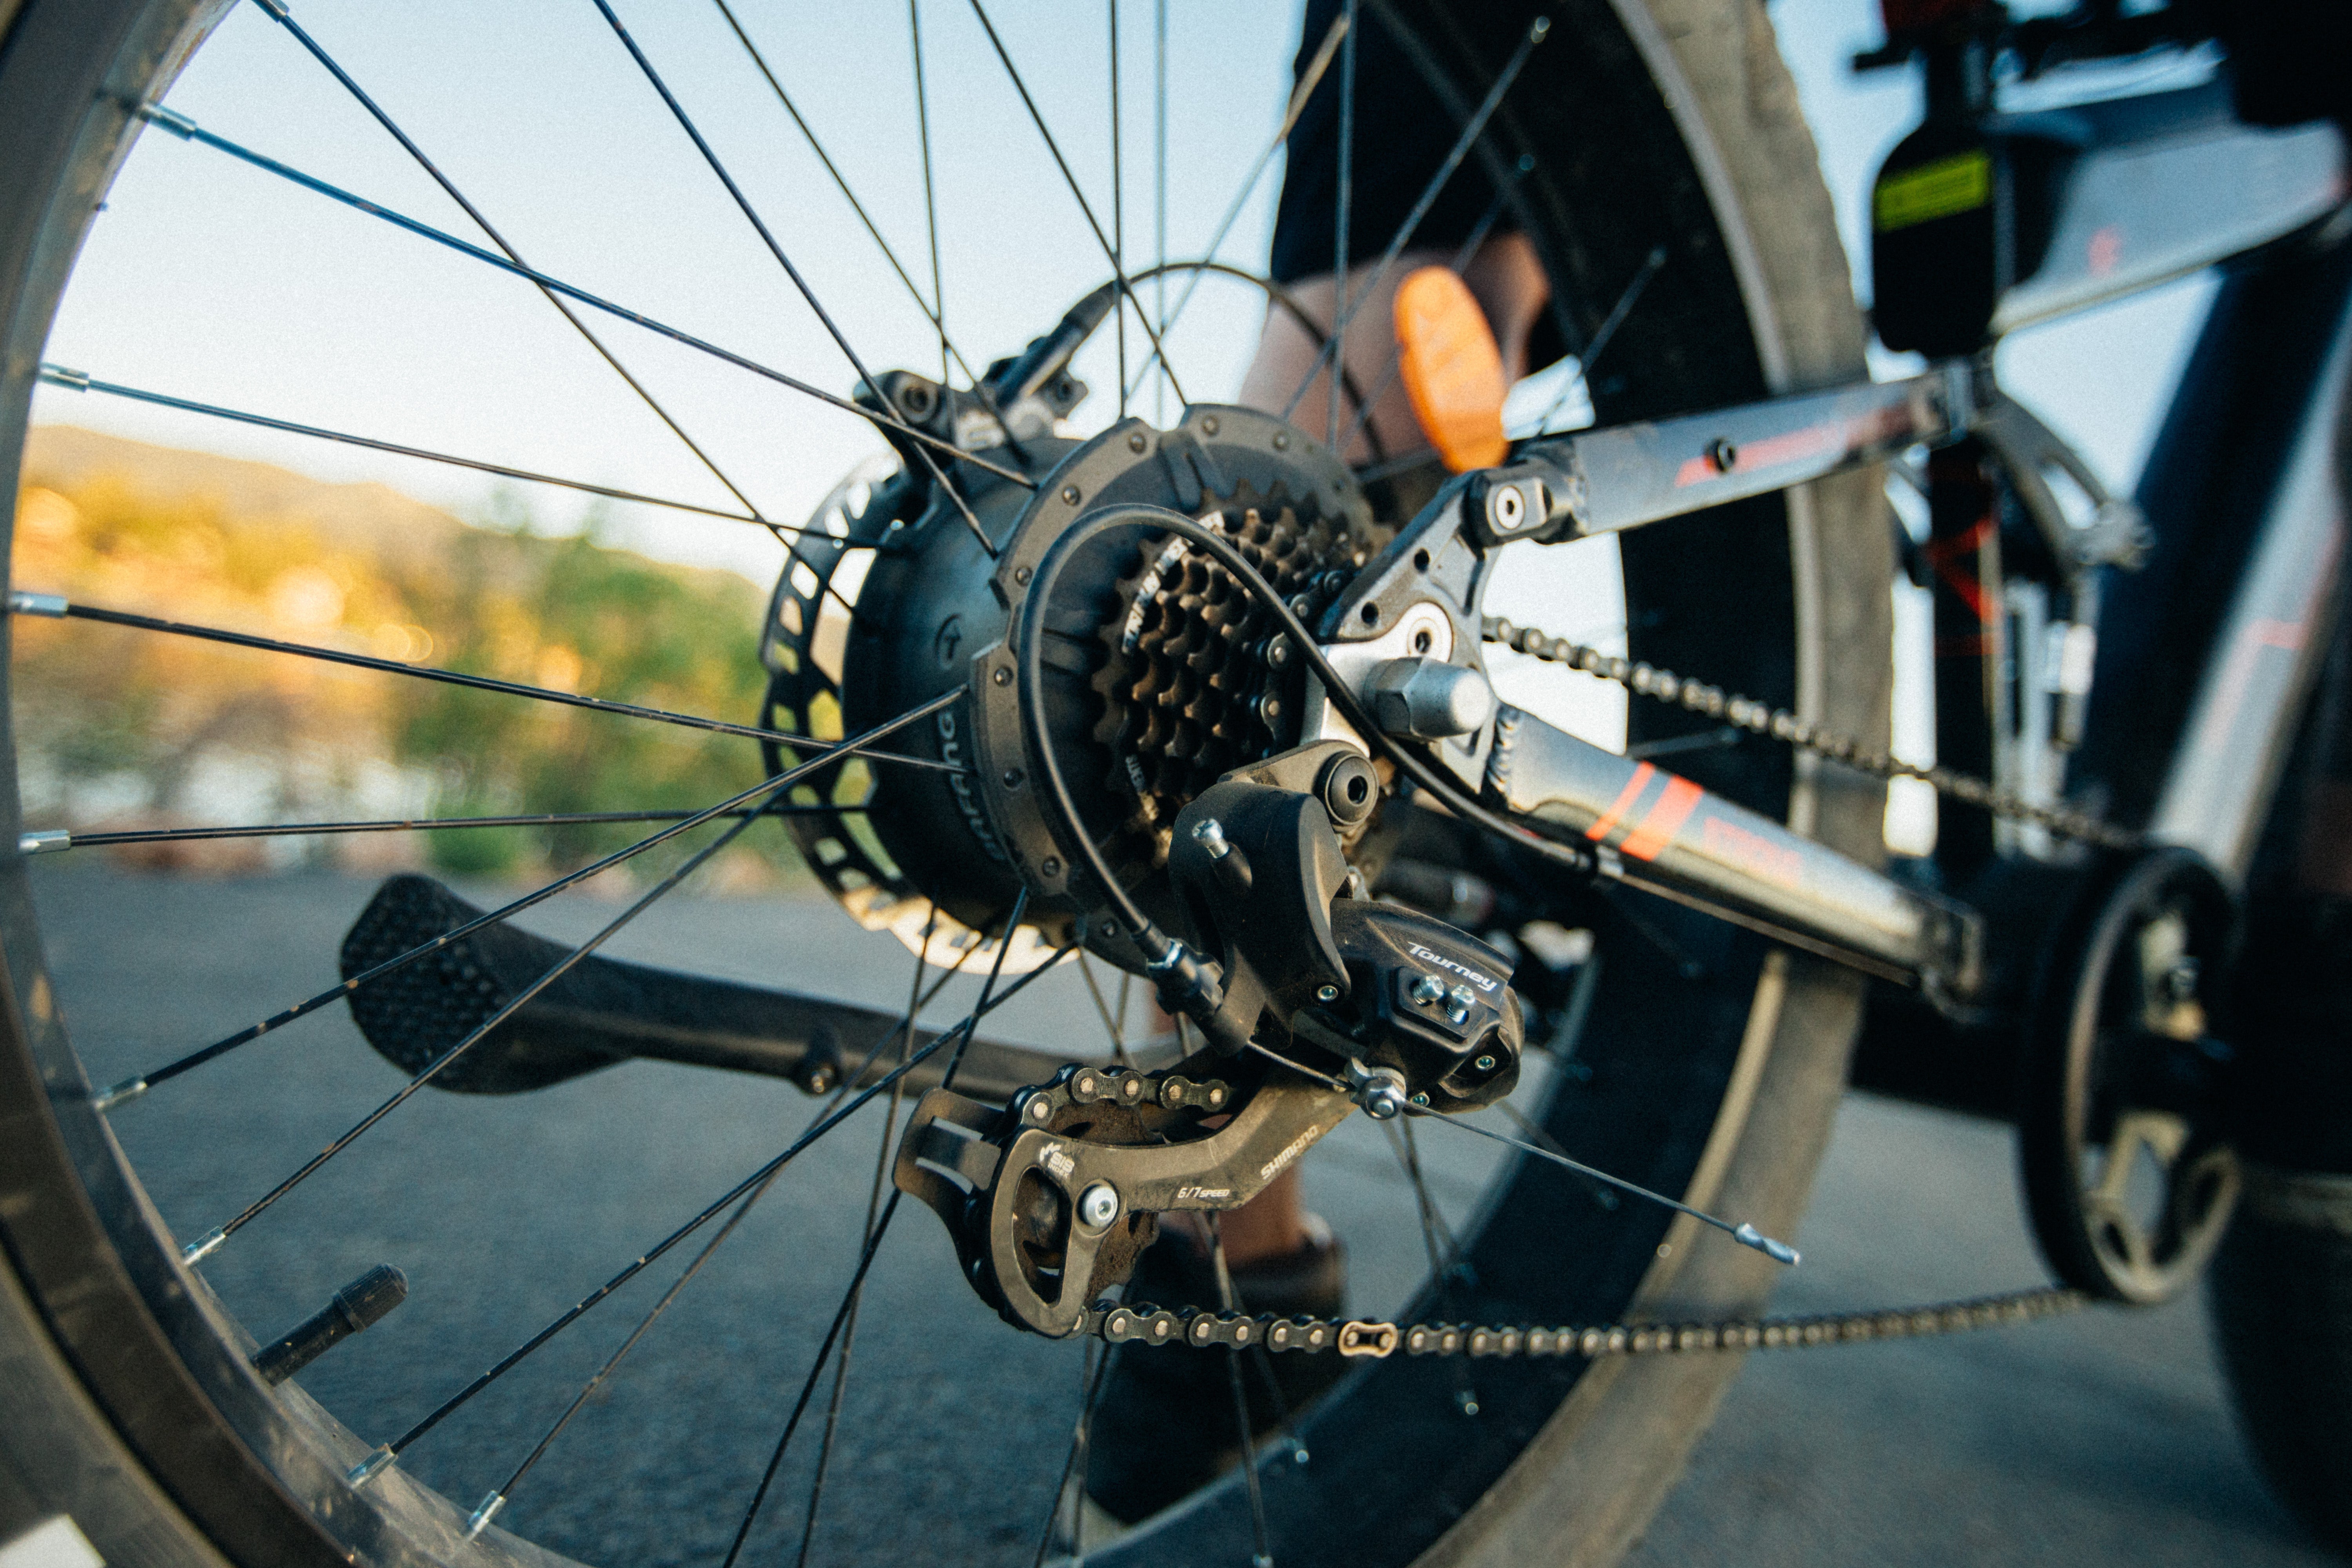
Owning an e-bike is a great way to enjoy eco-friendly transportation, explore the outdoors, and stay active. To ensure your e-bike remains in top condition and delivers the best performance, regular maintenance and proper care are essential. Here are some tips on how to maintain and care for your e-bike: 1. Keep It Clean Regular cleaning is crucial to keep your e-bike in good shape. Dirt, dust, and grime can accumulate on the bike, affecting its performance and longevity. Here's how to clean your e-bike properly: Use a mild detergent and water: Avoid using high-pressure washers as they can damage electrical components. Wipe down the frame: Use a soft cloth to wipe down the frame and other components. Clean the drivetrain: Use a brush and degreaser to clean the chain, gears, and derailleurs. 2. Battery Care The battery is the heart of your e-bike, and taking care of it is essential for optimal performance and longevity. Charge regularly: Don’t let the battery fully discharge before recharging. Keep it between 20% and 80% charge. Store properly: If not using the bike for an extended period, store the battery in a cool, dry place and charge it to around 50%. Avoid extreme temperatures: Both high and low temperatures can damage the battery. Store and charge the battery in a temperature-controlled environment. 3. Tire Maintenance Proper tire maintenance ensures a smooth and safe ride. Check tire pressure: Regularly check and maintain the recommended tire pressure. Under-inflated tires can reduce range and cause flats. Inspect for damage: Look for cuts, punctures, or any signs of wear and tear. Replace tires if necessary. Align the wheels: Ensure that the wheels are properly aligned to avoid uneven wear and improve handling. 4. Brake Maintenance Good brakes are crucial for safety. Inspect brake pads: Regularly check brake pads for wear and replace them when they are thin. Adjust brake cables: Ensure that brake cables are tight and responsive. Adjust or replace them if they feel loose. Clean brake discs: Keep the brake discs clean and free from oil or dirt to ensure effective braking. 5. Lubricate Moving Parts Lubrication is key to keeping your e-bike running smoothly. Chain lubrication: Regularly apply a suitable bicycle chain lubricant to keep the chain running smoothly. Pivot points: Lubricate the pivot points of the derailleurs and other moving parts to reduce friction and wear. Avoid over-lubrication: Excessive lubrication can attract dirt and cause more harm than good. Wipe off any excess lubricant after application. 6. Regular Check-Ups Even with regular maintenance, it's essential to have your e-bike checked by a professional periodically. Annual service: Take your e-bike to a professional for a comprehensive service at least once a year. Software updates: If your e-bike has electronic components that require software updates, ensure they are up-to-date for optimal performance. 7. Proper Storage Storing your e-bike properly can prevent unnecessary wear and tear. Indoor storage: Store your e-bike indoors to protect it from the elements. Use a bike cover: If you must store your e-bike outside, use a bike cover to protect it from rain, dust, and UV rays. Secure storage: Always lock your e-bike securely to prevent theft. Conclusion Regular maintenance and proper care can significantly extend the lifespan of your e-bike and ensure a safe and enjoyable riding experience. By following these tips, you can keep your e-bike in top condition and ready for all your adventures. Happy riding!
Read More
Understanding Ebike Torque: Why It Matters in Your Ride
Jan 27, 2025 11:11
When it comes to electric bikes (Ebike), one of the key technical specifications that often stands out is torque. But what exactly is torque, and why should it matter to you as a rider? What is Torque? In simple terms, torque refers to the rotational force that the motor of an electric bike generates. It's what propels you forward when you twist the throttle or pedal. Torque is measured in Newton-meters (Nm) and directly influences how quickly and efficiently your Ebike accelerates, especially when climbing hills or starting from a standstill. Why Does Torque Matter? Acceleration and Power: Higher torque means quicker acceleration. This is crucial for urban commuting or situations where you need to maneuver through traffic swiftly. Hill Climbing: Ebikes with higher torque can tackle steep inclines with greater ease. This capability is particularly advantageous for riders in hilly terrain or those carrying heavier loads. Efficiency: Torque efficiency ensures that your Ebike performs optimally across various riding conditions, enhancing your overall riding experience. Choosing the Right Torque for You When selecting an Ebike, consider your typical riding environment and style: City Commuters: Look for models with moderate to high torque for responsive urban riding. Off-Road Enthusiasts: Opt for Ebikes with higher torque ratings to conquer rugged terrains effortlessly. Leisure Riders: Balance torque with battery efficiency to enjoy longer rides without compromising performance. Conclusion Ebike torque isn't just a technical detail; it directly impacts your riding experience. Whether you prioritize speed, power, or efficiency, understanding and choosing the right torque specification can significantly enhance how you enjoy your Ebike adventures. Ready to experience the difference torque makes? Explore our range of Ebikes designed to deliver the perfect blend of performance and reliability for every rider.
Read More
Everything You Need to Know About Bicycle Light Lumens
Jan 24, 2025 11:13
When it comes to cycling, safety is paramount. One of the most critical components for ensuring your visibility on the road is your bicycle light. With numerous options available, choosing the right light can be challenging. A key factor in making this decision is understanding lumens, the measure of light output. This guide will explain what lumens are, why they matter, and how to choose the best bike light for your needs. What Are Lumens? Lumens are a unit of measurement for the total amount of visible light emitted by a source. Simply put, lumens indicate how bright a light will appear. The higher the lumen count, the brighter the light. Why Lumens Matter for Bicycle Lights Visibility is crucial when riding a bicycle, especially in low-light conditions or at night. The brightness of your bike light affects how well you can see obstacles ahead and how visible you are to others. Understanding lumens helps you select a light that ensures safety and enhances your cycling experience. How Many Lumens Do You Need? The number of lumens you need depends on where and how you ride. Here’s a quick guide: For Urban Commuting 100 to 200 lumens: Sufficient for well-lit city streets where you mainly need to be seen by others. For Suburban or Rural Riding 200 to 600 lumens: Ideal for areas with less street lighting. These lights provide better visibility of the road ahead and increase your visibility to others. For Off-Road or Trail Riding 600 to 1000+ lumens: Necessary for unlit paths and trails. These lights illuminate obstacles and the terrain ahead, making your ride safer. For Daytime Riding 100 to 500 lumens: Even during the day, a bright light can enhance your visibility to motorists, especially in conditions like fog or heavy rain. Factors to Consider When Choosing a Bike Light Beam Pattern The beam pattern affects how the light is distributed. A wide beam pattern is great for off-road riding as it covers more area, while a focused beam is better for long-distance visibility on roads. Battery Life Consider how long you will be riding and choose a light with sufficient battery life. Rechargeable lights are eco-friendly and convenient, but it’s essential to ensure they can last your entire ride. Mounting and Adjustability A good bike light should be easy to mount and adjust. Ensure the light can be securely attached to your bike and adjusted to point in the desired direction. Weather Resistance Cycling often means braving the elements. Ensure your bike light is weather-resistant to withstand rain, mud, and dust. Top Recommendations for Bike Lights Urban Commuting Cygolite Metro 400: Offers 400 lumens with multiple brightness settings and a compact design. Suburban or Rural Riding Lezyne Macro Drive 600XL: Provides 600 lumens with excellent battery life and durability. Off-Road or Trail Riding NiteRider Lumina 1000: Delivers 1000 lumens, perfect for challenging trails and long rides. Daytime Visibility Bontrager Ion 200 RT: Compact yet powerful with 200 lumens, designed specifically for daytime visibility. Choosing the right bicycle light involves understanding lumens and how they affect your visibility. By considering your riding environment and preferences, you can select a light that ensures safety and enhances your cycling experience. Whether you're commuting in the city, riding through rural areas, or tackling off-road trails, there's a perfect light out there for you. Stay safe and happy riding!
Read More
Is Step-through Frame Safe?
Jan 20, 2025 11:15
The question of whether a step-through frame is safe often arises when considering bicycles for various purposes, especially among those who are new to cycling or those who prioritize comfort and ease of use. Step-through frames, also known as "ladies' bikes" or "comfort bikes," are designed with a lower, more accessible top bar that allows riders to mount and dismount the bike without having to swing a leg over a high crossbar. This design feature is particularly appealing to those who may have limited flexibility, are wearing skirts or dresses, or simply prefer a more convenient riding experience. When it comes to safety, the step-through frame design does not inherently compromise the structural integrity of the bicycle. In fact, many modern step-through frames are constructed from high-quality materials like aluminum or carbon fiber, which are lightweight but extremely durable. The design itself may offer additional stability, as the lower center of gravity can make the bike easier to balance, especially for beginners. However, safety is not solely determined by the frame design but also by factors such as the quality of the components, the condition of the bike, and the riding habits of the user. A well-maintained step-through bike with quality brakes, tires, and handlebars can be as safe as any other type of bicycle. Riders should always ensure that their bikes are properly adjusted to fit their body size and riding style, and they should practice safe riding habits, such as wearing a helmet, obeying traffic rules, and riding at a safe speed. It's also worth noting that step-through frames may not be the best choice for certain types of riding, such as mountain biking or high-speed road cycling, where a more traditional frame design may offer greater rigidity and responsiveness. But for casual riding, commuting, or leisurely activities, a step-through frame can provide a safe and comfortable riding experience. In conclusion, the safety of a step-through frame bicycle depends on multiple factors, including the quality of the bike, the condition of its components, and the riding habits of the user. While the design itself does not compromise safety, it is essential to ensure that the bike is suitable for the intended use and that the rider practices safe riding techniques. With proper care and attention, a step-through frame bike can be a safe and enjoyable choice for many riders.
Read More
Electric Bike Sensors Explained: Torque vs. Cadence—Which One Is Right for You?
Jan 17, 2025 11:16
When it comes to electric bikes, the type of sensor you choose can significantly impact your riding experience. Two popular options are torque sensors and cadence sensors, each with its unique benefits and features. Understanding how they work and what they offer can help you make an informed choice. Torque Sensors How They WorkTorque sensors measure the amount of force you apply to the pedals. This data allows the bike to adjust the motor assistance in real-time, providing power that feels more natural and responsive to your effort. Advantages Natural Riding Experience: Torque sensors create a seamless interaction between the rider and the bike, especially useful in challenging terrains like hills. Enhanced Control: They allow for more precise control over power output, which can improve your overall performance and comfort. Who It’s ForTorque sensors are ideal for performance-oriented cyclists or those who frequently ride in varied terrains. If you enjoy long-distance rides or tackling steep inclines, this type of sensor may be the best choice. Cadence Sensors How They WorkCadence sensors, on the other hand, measure how fast you are pedaling, providing assistance based on your pedaling frequency. They maintain a consistent power output regardless of the force applied. Advantages Simplicity: Cadence sensors are typically easier to maintain and install, making them a straightforward option for many riders. Ideal for Flat Terrain: They work well for urban commuting and leisurely rides, where maintaining a steady pace is more common than tackling steep hills. Who It’s ForCadence sensors suit casual riders, commuters, or those who primarily ride on flat terrain. If you’re looking for a bike that offers reliable performance without the need for extensive adjustments, this might be your best option. How to Choose Riding HabitsConsider how you typically ride. If you prioritize performance and control, a torque sensor may enhance your experience. For casual riding or commuting, a cadence sensor might suffice. Terrain ConsiderationsEvaluate the types of routes you frequent. Riders in hilly areas will benefit more from torque sensors, while those in urban environments may find cadence sensors meet their needs. Budget FactorsFinally, consider your budget. Torque sensors can be more expensive but may offer greater performance benefits. Weigh the initial investment against the long-term value based on your riding style. Conclusion Both torque and cadence sensors have their strengths and weaknesses, catering to different types of cyclists. By analyzing your riding habits, the terrains you navigate, and your budget, you can choose the sensor that best aligns with your cycling goals. Whether you opt for the precision of a torque sensor or the simplicity of a cadence sensor, the right choice will enhance your electric biking experience. Happy riding!
Read More
Understanding Ebike Classes: What You Need to Know About Class 1, 2, and 3
Jan 13, 2025 11:17
Electric bikes (ebikes) are transforming how we commute, exercise, and enjoy the outdoors. If you're shopping for an ebike or just curious about them, you've likely come across terms like Class 1, Class 2, and Class 3. But what do these classifications mean, and how do they affect your ride? Let’s dive into the details. Class 1: Pedal Assist Only Class 1 ebikes are the simplest type of ebike. These bikes use a pedal-assist system (PAS), which means the motor provides assistance only when you’re pedaling. There’s no throttle to accelerate without pedaling. This type of ebike is designed to help riders tackle hills, headwinds, and long distances without wearing them out. Top speed: The motor assists you up to 20 mph (32 km/h). After that, it stops providing power, and you're on your own! Ideal for: Commuters, casual riders, and those looking for a little help on longer trips. Legal access: Class 1 ebikes are generally allowed anywhere regular bikes are permitted, including bike lanes and trails, making them one of the most versatile options. Class 2: Pedal Assist and Throttle Class 2 ebikes take things up a notch by including both pedal assist and a throttle feature. You can still pedal and receive assistance, but you also have the option to use the throttle for a motorized boost without pedaling. This can be particularly useful for starting from a stop or if you want to take a break from pedaling. Top speed: Like Class 1, the top speed is 20 mph (32 km/h). However, the throttle allows you to maintain this speed without pedaling. Ideal for: Riders who want the flexibility of pedaling or using the throttle, especially for quick bursts of speed or easier hill climbing. Legal access: Similar to Class 1, Class 2 ebikes are allowed on most bike lanes and trails, though some areas may have restrictions on throttle use. Class 3: Speed Pedelec (Pedal Assist Only, but Faster!) If you’re looking for more speed, Class 3 ebikes are where it's at. These bikes feature pedal assist like Class 1 but with a higher maximum assisted speed. There’s no throttle on these bikes, so you'll have to pedal to activate the motor. Top speed: The motor will assist you up to 28 mph (45 km/h), making them significantly faster than Class 1 or 2 ebikes. Ideal for: Commuters looking to cover more distance quickly, experienced cyclists, and those comfortable riding at higher speeds. Legal access: Class 3 ebikes are more restricted. While they’re allowed on roads and bike lanes, they’re often prohibited from shared-use paths and off-road trails due to their higher speed. Which Class Should You Choose? The choice between Class 1, 2, and 3 depends on your riding style, local regulations, and where you plan to ride: If you’re a commuter using bike lanes and urban paths, Class 1 or 3 might be your best bet. If you want versatility and the ability to take breaks from pedaling with a throttle, Class 2 offers the perfect balance. For speed enthusiasts and those tackling longer, faster rides, Class 3 ebikes provide a thrilling experience, though you’ll need to be mindful of local restrictions. Regulations to Keep in Mind Each country, state, and even city may have different laws governing ebike use. While the 20 mph limit is a common cutoff for Class 1 and 2 ebikes, Class 3 ebikes may require you to wear a helmet or restrict access to certain paths. Always check your local laws before buying or riding an ebike. Final Thoughts Understanding the differences between Class 1, 2, and 3 ebikes is essential when choosing the right bike for your needs. Whether you want an extra boost on your commute, the flexibility of a throttle, or the thrill of higher speeds, there’s an ebike class for you. Just be sure to factor in your local regulations and where you plan to ride to ensure a safe and enjoyable experience.
Read More
E-Mountain Bike vs Regular Mountain Bike: A Comparative Analysis
Jan 10, 2025 10:53
The world of mountain biking has undergone significant changes in recent years, with the emergence of electric mountain bikes (E-MTBs) as a popular alternative to traditional, regular mountain bikes. The debate surrounding the pros and cons of these two types of bikes has gained momentum, as riders seek to understand the differences and decide which one suits their needs better. In this article, we delve into the comparison between E-MTBs and regular mountain bikes, exploring their unique features, performance, and suitability for different riding scenarios. Performance Capabilities The most notable difference between E-MTBs and regular mountain bikes lies in their performance capabilities. E-MTBs are equipped with a motor and battery system that provides an additional boost of power, enhancing the rider's climbing abilities and overall speed. This added assistance makes E-MTBs particularly suitable for riders who encounter steep inclines or who seek to traverse long distances with less effort. On the other hand, regular mountain bikes rely solely on the rider's physical strength and technique to traverse difficult terrain. They offer a more traditional riding experience, requiring riders to put in more effort, especially when climbing steep hills. However, this hands-on approach also allows riders to develop a deeper connection with their bikes and to fully immerse themselves in the challenges of mountain biking. Range and Battery Life The range and battery life of E-MTBs are crucial considerations for riders. The range refers to the distance an E-MTB can travel on a single battery charge, while battery life refers to the duration of the battery's useful life. E-MTBs typically offer a range of several tens of kilometers, depending on the motor's power, the terrain, and the riding style. Riders need to plan their rides accordingly, ensuring they have enough battery power to complete the intended route. Battery life, on the other hand, can vary depending on the quality of the battery and how it is maintained. Riders need to be mindful of charging the battery regularly and replacing it when necessary to ensure optimal performance. Regular mountain bikes, of course, have no such concerns about range or battery life. Riders can simply pedal as long as they have the physical energy to do so, without worrying about running out of power. Cost and Maintenance The cost of E-MTBs is generally higher than that of regular mountain bikes, primarily due to the additional components and technology involved. Riders need to factor in the initial purchase price, as well as the potential cost of replacing batteries and other components over time. Maintenance requirements for E-MTBs are also slightly more complex. Riders need to keep the motor and battery system in good condition, ensuring they are properly maintained and free from damage. Regular checks and replacements of parts may be necessary to ensure optimal performance. Regular mountain bikes, on the other hand, tend to be more affordable and require less maintenance. Riders can focus on basic maintenance tasks like lubricating chains, adjusting brakes, and checking tire pressure, without having to worry about complex electrical systems. Suitability for Different Riders and Riding Styles The suitability of E-MTBs and regular mountain bikes depends greatly on the rider's preferences and riding style. E-MTBs are ideal for riders who value convenience and efficiency, especially those who may not have the physical strength or endurance to tackle difficult terrain on a regular bike. They are also suitable for riders who seek to enjoy the scenery and the outdoors without putting in too much effort. Regular mountain bikes, on the other hand, are preferred by riders who enjoy the challenge and the sense of accomplishment that comes from relying solely on their own strength and technique. They offer a more authentic and traditional mountain biking experience, appealing to riders who seek a deeper connection with their sport. Environmental Impact The environmental impact of E-MTBs and regular mountain bikes is another important consideration. E-MTBs, with their motors and batteries, may have a higher environmental footprint than regular bikes, especially when it comes to battery disposal and recycling. However, the development of more efficient and environmentally friendly battery technology is ongoing, and future models may offer improved sustainability. Regular mountain bikes, on the other hand, have a relatively low environmental impact. They require no electricity or fossil fuels to operate, making them a more environmentally friendly choice. Riders can further reduce their impact by choosing sustainable materials and practices for their bikes and riding gear. Conclusion In conclusion, the choice between E-MTBs and regular mountain bikes depends on the rider's specific needs, preferences, and riding style. E-MTBs offer added convenience, efficiency, and climbing ability, making them suitable for riders who value these aspects. Regular mountain bikes, on the other hand, provide a more traditional and challenging riding experience, appealing to riders who seek a deeper connection with them.
Read More
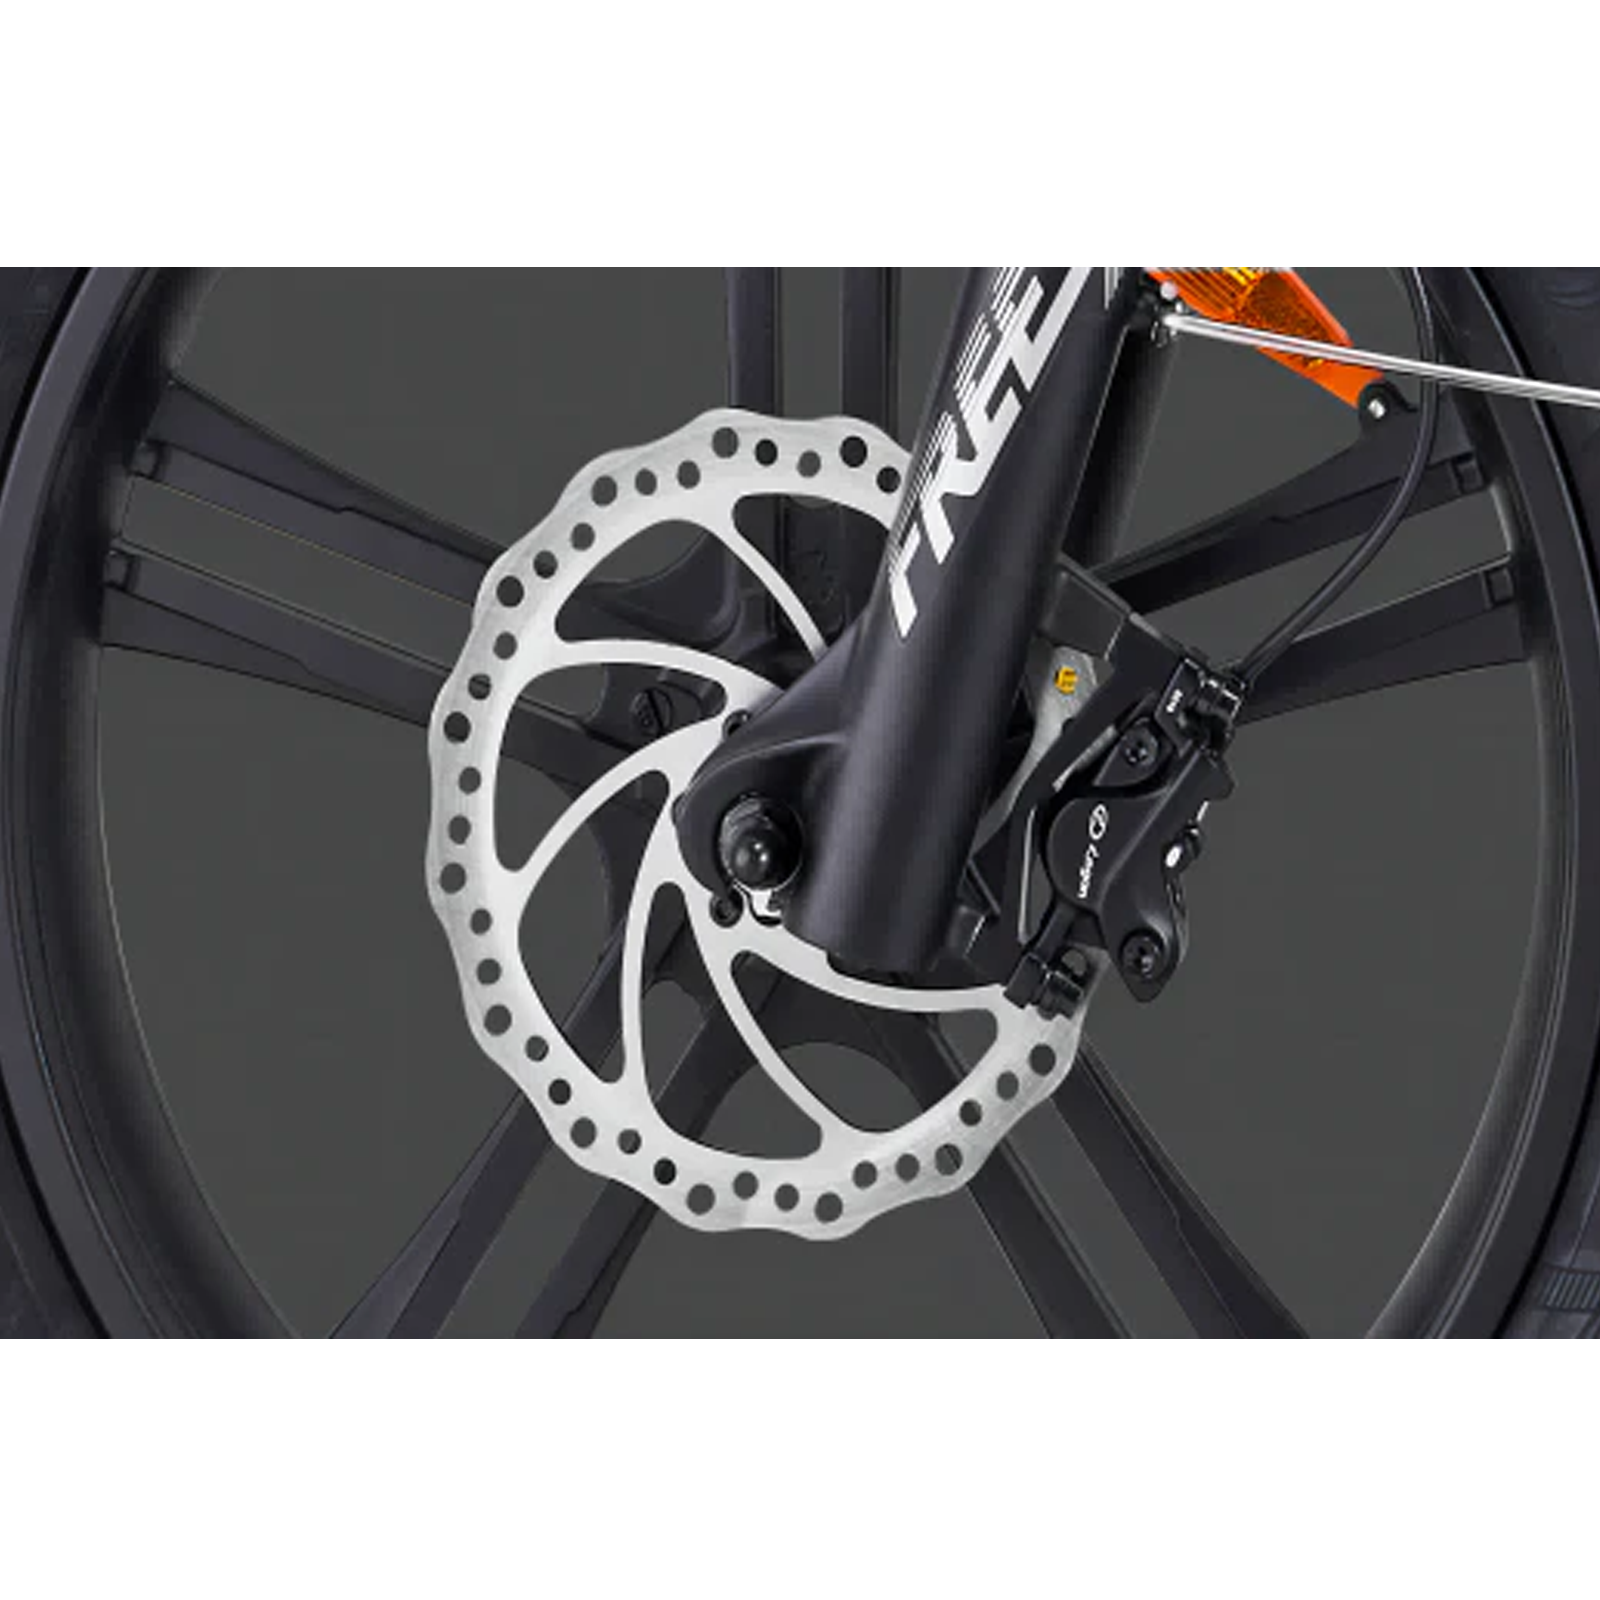
Mechanical Vs. Hydraulic Brakes: How To Choose
Jan 06, 2025 10:52
When it comes to choosing the right braking system for your bicycle, you have two main options: mechanical brakes and hydraulic brakes.The best choice for you will depend on your riding style, maintenance preferences, and budget. We’ll break down the differences between mechanical and hydraulic brakes to help you make an informed decision. Understanding Mechanical Brakes Mechanical brakes, also known as cable-actuated brakes, use a steel cable to connect the brake lever to the brake caliper. When you squeeze the brake lever, it pulls the cable, which in turn pulls the brake pads against the rim (in the case of rim brakes) or rotor (in the case of disc brakes). Pros of Mechanical Brakes Simplicity: Mechanical brakes are simpler in design and easier to understand. This makes them a popular choice for those new to cycling or those who prefer a straightforward system. Ease of Maintenance: Because they rely on cables and simple mechanisms, mechanical brakes are generally easier to maintain and repair. You can easily replace worn cables and adjust the tension without needing specialized tools or knowledge. Cost: Mechanical brakes tend to be more affordable than their hydraulic counterparts. If you’re on a tight budget, mechanical brakes can offer reliable performance without breaking the bank. Cons of Mechanical Brakes Performance in Wet Conditions: Mechanical brakes can be less effective in wet or muddy conditions. The cables can become contaminated with dirt and moisture, leading to decreased braking power. Modulation: Modulation refers to the ability to precisely control the amount of braking force. Mechanical brakes often have less modulation, making it harder to apply gradual braking force. Understanding Hydraulic Brakes Hydraulic brakes use fluid to transfer force from the brake lever to the brake caliper. When you squeeze the brake lever, it pushes fluid through a sealed system, which then pushes the brake pads against the rotor. Pros of Hydraulic Brakes Superior Braking Power: Hydraulic brakes offer more powerful and consistent braking. The fluid transfer system is more efficient, providing better stopping power with less effort. Excellent Modulation: Hydraulic brakes excel in modulation, allowing for smoother and more controlled braking. This is particularly beneficial for technical riding and in varying terrain conditions. Low Maintenance: While initial setup can be more complex, hydraulic systems are generally low maintenance. They are sealed and less prone to contamination, requiring less frequent adjustments and repairs. Cons of Hydraulic Brakes Complexity: Hydraulic brakes are more complex and can be intimidating for those unfamiliar with their operation. Repairs and maintenance can require specialized tools and knowledge. Cost: Hydraulic brake systems are usually more expensive than mechanical ones. This higher cost can be a deterrent for budget-conscious cyclists. Potential for Leaks: Although rare, hydraulic systems can develop leaks. A leak in the system can significantly reduce braking performance and require immediate attention. How to Choose When deciding between mechanical and hydraulic brakes, consider the following factors: Riding Style: If you frequently ride in technical terrain, downhill, or in wet conditions, hydraulic brakes may offer the superior performance you need. For casual riders or those who mainly ride on flat, dry surfaces, mechanical brakes can be more than sufficient. Maintenance Preferences: If you prefer a low-maintenance system and don’t mind the initial complexity, hydraulic brakes are a good choice. If you enjoy tinkering with your bike and want a system that’s easy to adjust and repair on your own, mechanical brakes might be better. Budget: Mechanical brakes are the way to go if you’re looking for a cost-effective solution. They provide reliable braking performance at a lower cost. However, if you’re willing to invest more for better performance and lower long-term maintenance, hydraulic brakes are worth considering. Experience Level: For beginners, mechanical brakes offer simplicity and ease of use. More experienced cyclists who are comfortable with bike maintenance may appreciate the advanced performance of hydraulic brakes. Choosing between mechanical and hydraulic brakes ultimately comes down to your personal preferences and riding needs. Mechanical brakes offer simplicity, ease of maintenance, and affordability, making them ideal for casual riders and beginners. On the other hand, hydraulic brakes provide superior braking power, excellent modulation, and low maintenance, which can be a game-changer for technical and demanding rides. Evaluate your riding style, maintenance comfort level, budget, and experience to make the best decision for your cycling adventures. Whether you opt for mechanical or hydraulic brakes, ensuring they are properly installed and maintained will keep you safe and enhance your riding experience.
Read More
How to Repair an Electric Bike Controller: A Step-by-Step Guide
Jan 03, 2025 10:51
The controller is the brain of your electric bike, managing motor performance, speed, and overall operation. If your e-bike is malfunctioning, the controller could be the culprit. In this post, we’ll guide you through diagnosing and repairing your electric bike controller to keep your ride smooth and problem-free. 1. Preparing for the Repair Tools and Materials: Before you start, gather the necessary tools and materials: Screwdriver set Multimeter Soldering iron and solder Wire strippers Heat shrink tubing Electrical tape Safety Precautions: Always disconnect the battery before performing any electrical work to avoid shocks or short circuits. Wear protective gloves and work in a well-lit, ventilated area. 2. Diagnosing the Problem Check for External Damage: Start by inspecting the controller's exterior for any obvious damage, such as burnt spots, broken wires, or loose connectors. These are often easy to spot and fix. Test the Voltage with a Multimeter: If no external damage is visible, use a multimeter to measure the input voltage of the controller. Ensure the voltage is within the normal range. If it’s not, the problem might lie with the battery or connectors. Inspect Internal Components: If the exterior and voltage check out, you’ll need to open the controller and inspect the internal components like capacitors, resistors, and other elements for signs of damage or burning. 3. Repairing the Controller Replace Damaged Wires or Connectors: If you find broken or loose wires, use wire strippers to prepare the ends, solder them back together, and protect the connection with heat shrink tubing or electrical tape. Replace Damaged Components: If you discover burnt capacitors or other damaged components, replace them with parts of the same specifications. Be careful when soldering to avoid damaging other components. Reset the Controller: If there’s no apparent hardware issue, try resetting the controller. Some controllers have a reset button, while others might require disconnecting and reconnecting the power. After resetting, test if the controller functions properly. 4. Testing and Reinstallation Test the Repair: Before reinstalling the controller, test it to ensure all issues have been resolved. Reconnect the battery and check if the controller properly manages the motor and other functions. Reinstall the Controller: If everything works as expected, reinstall the controller on your bike, ensuring all screws and connectors are securely fastened. 5. Preventing Future Issues Regular Maintenance: To avoid future issues, regularly check the condition of the controller and other electrical components. Look for signs of wear or loose connections. Waterproofing: Controllers are susceptible to moisture, so if you often ride in wet conditions, consider using waterproofing measures to protect the controller. Conclusion By following these steps, you should be able to resolve most issues with your electric bike controller yourself. If you encounter more complex problems that you can’t fix, it’s best to consult a professional. Remember, safety first—always ensure the power is off before working on any electrical components. Share Your Experience If you have other tips or experiences with repairing electric bike controllers, share them in the comments below. Let’s keep our rides smooth and safe!
Read More